Wally
Gentoo Linux on MSI GT735 Laptop
Last update: March 21, 2010


MSI GT735

Hardware specs:
Status under Linux:
Drivers/Notes:
 · 2.2Ghz AMD Turion(tm) X2 Ultra Dual-Core Mobile ZM-82 Socket S1g2 CPUWorkscpufrequtils is able to scale between 2.2Ghz, 1.1Ghz, and 550Mhz
 · 17" LCD Display with 1680x1050 Native ResolutionWorksNothing
 · 4096MB DDR2 RAMWorksNothing
 · 320GB Fujitsu SATA 7200 RPM HDDWorks'ahci' SATA driver
 · Optiarc DVD RW AD-7560SWorksNothing
 · ATI Mobile Radeon HD 3850 Graphics ChipWorksI currently use the open source 'radeon' driver
* Read Below *
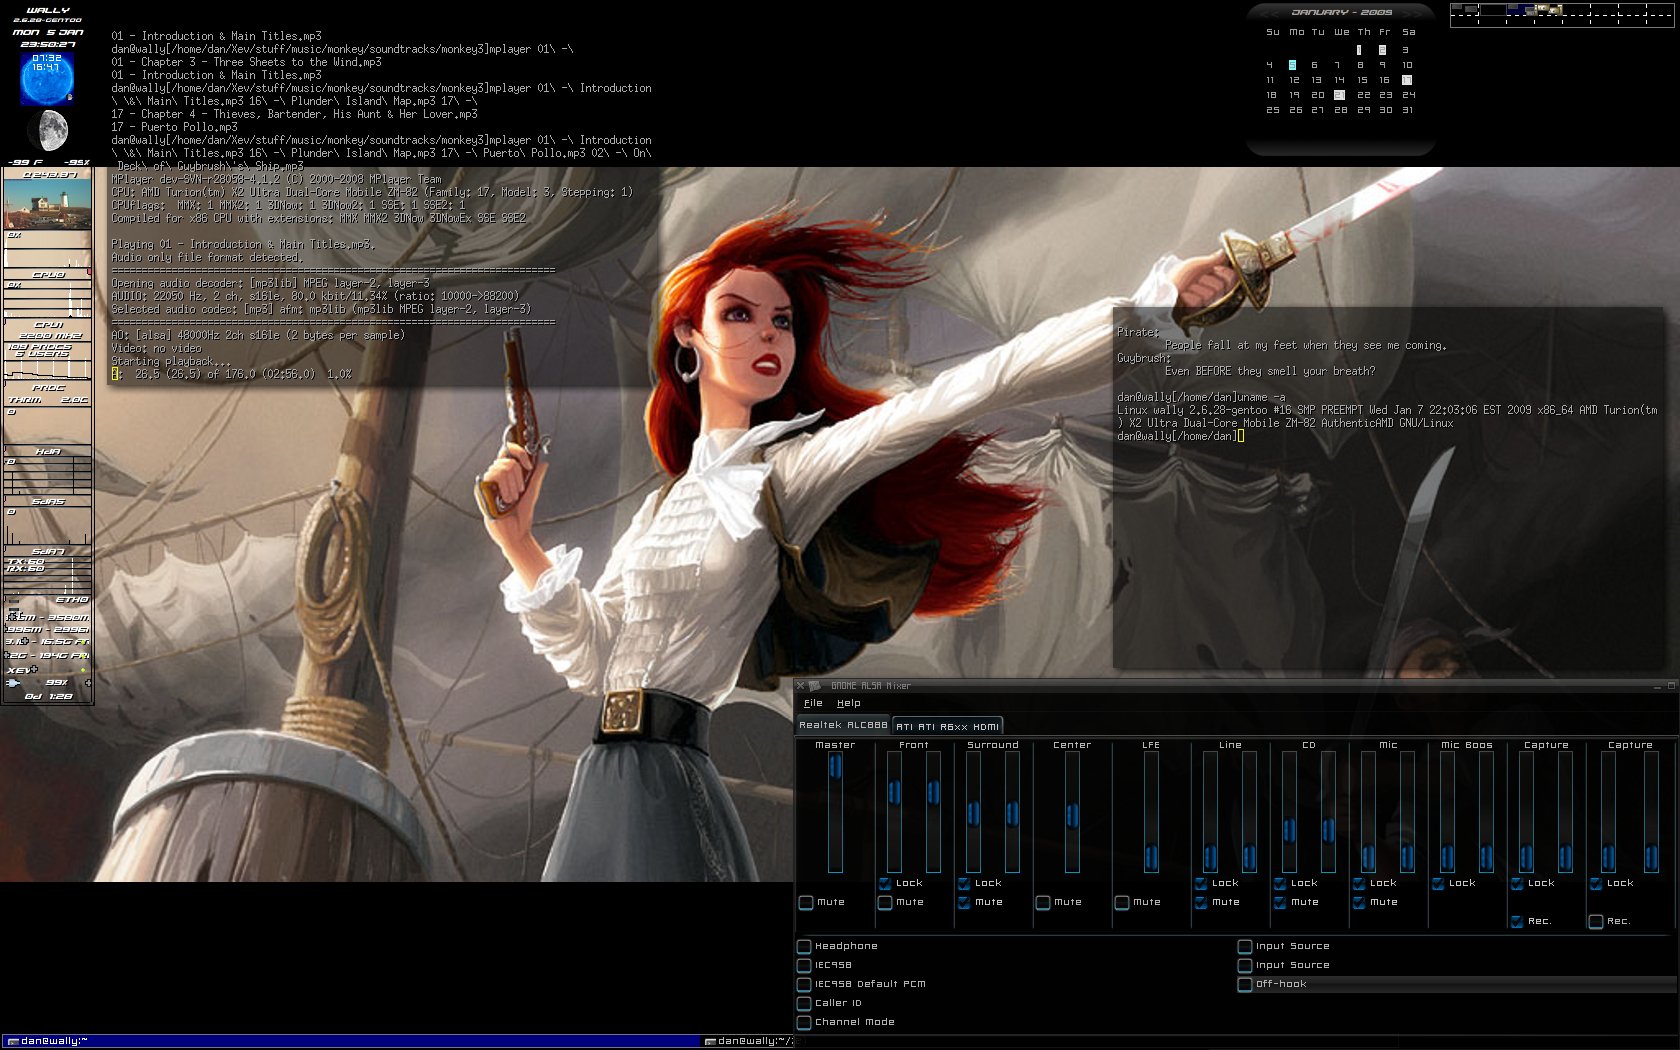
 · ATI SB700/Realtek ALC888 AudioWorksUse the 'hda_intel' driver for sound with ALSA - be sure to include the ATI HDMI support options as well
* Read Below *
 · Realtek RTL8111/8168B PCI Express Gigabit EthernetWorks'r8169' driver
 · RaLink 2860 Wireless LANWorksThere is a driver 'rt2860' which is located in the staging drivers in the kernel, as well as an VERY EXPERIMENTAL driver from rt2x00
* Read Below *
 · Toshiba BluetoothWorksUse the default Bluetooth kernel options and BlueZ
* Read Below *
 · ENE0100 CIR (Infrared Receiver)Works'ene0100' driver in LIRC
* Read Below *
 · JMicron SD Host ControllerWorks'memstick' and 'jmb38x' drivers both needed
 · JMicron 1394 (Firewire)WorksBasic OHCI-1394 drivers
 · Chicony USB Camera (Sonix 260) built-in webcamWorks'uvcvideo' driver


lspci:

For good measures, here is my output of 'lspci':

00:00.0 Host bridge: Advanced Micro Devices [AMD] RS780 Host Bridge
00:02.0 PCI bridge: Advanced Micro Devices [AMD] RS780 PCI to PCI bridge (ext gfx port 0)
00:04.0 PCI bridge: Advanced Micro Devices [AMD] RS780 PCI to PCI bridge (PCIE port 0)
00:05.0 PCI bridge: Advanced Micro Devices [AMD] RS780 PCI to PCI bridge (PCIE port 1)
00:06.0 PCI bridge: Advanced Micro Devices [AMD] RS780 PCI to PCI bridge (PCIE port 2)
00:07.0 PCI bridge: Advanced Micro Devices [AMD] RS780 PCI to PCI bridge (PCIE port 3)
00:09.0 PCI bridge: Advanced Micro Devices [AMD] RS780 PCI to PCI bridge (PCIE port 4)
00:11.0 SATA controller: ATI Technologies Inc SB700/SB800 SATA Controller [AHCI mode]
00:12.0 USB Controller: ATI Technologies Inc SB700/SB800 USB OHCI0 Controller
00:12.1 USB Controller: ATI Technologies Inc SB700 USB OHCI1 Controller
00:12.2 USB Controller: ATI Technologies Inc SB700/SB800 USB EHCI Controller
00:13.0 USB Controller: ATI Technologies Inc SB700/SB800 USB OHCI0 Controller
00:13.2 USB Controller: ATI Technologies Inc SB700/SB800 USB EHCI Controller
00:14.0 SMBus: ATI Technologies Inc SBx00 SMBus Controller (rev 3a)
00:14.1 IDE interface: ATI Technologies Inc SB700/SB800 IDE Controller
00:14.2 Audio device: ATI Technologies Inc SBx00 Azalia (Intel HDA)
00:14.3 ISA bridge: ATI Technologies Inc SB700/SB800 LPC host controller
00:14.4 PCI bridge: ATI Technologies Inc SBx00 PCI to PCI Bridge
00:18.0 Host bridge: Advanced Micro Devices [AMD] Family 11h HyperTransport Configuration (rev 40)
00:18.1 Host bridge: Advanced Micro Devices [AMD] Family 11h Address Map
00:18.2 Host bridge: Advanced Micro Devices [AMD] Family 11h DRAM Controller
00:18.3 Host bridge: Advanced Micro Devices [AMD] Family 11h Miscellaneous Control
00:18.4 Host bridge: Advanced Micro Devices [AMD] Family 11h Link Control
01:00.0 VGA compatible controller: ATI Technologies Inc Mobility Radeon HD 3850
01:00.1 Audio device: ATI Technologies Inc Radeon HD 3870 Audio device
04:00.0 Network controller: RaLink RT2860
06:00.0 Ethernet controller: Realtek Semiconductor Co., Ltd. RTL8111/8168B PCI Express Gig abit Ethernet controller (rev 02)
07:00.0 FireWire (IEEE 1394): JMicron Technologies, Inc. IEEE 1394 Host Controller
07:00.1 System peripheral: JMicron Technologies, Inc. SD/MMC Host Controller
07:00.2 SD Host controller: JMicron Technologies, Inc. Standard SD Host Controller
07:00.3 System peripheral: JMicron Technologies, Inc. MS Host Controller
07:00.4 System peripheral: JMicron Technologies, Inc. xD Host Controller


General Installation:

Not really much to it. Everything is pretty well supported. I did run into some issues with the sound, however that was mostly my own fault for not understanding the intel-hda codec. * Read Below *

For Gentoo installation, check out the Gentoo x86 quick install guide if you're very impatient like me and want to get it done real quick. It is a rather straight forward procedure.

·ATI Mobility Radeon HD 3850 - The only issue that some may run into is DRI support for this chip. This is my first ATI graphics chip in a long time so I can't say for sure, but if history has taught us anything, DRI support in Linux with ATI has been a bit of a problem. I followed the instructions from Gentoo Linux ATI FAQ and Hardware 3D Acceleration Guide and was able to get it working with my first try. The two sites are Gentoo documentation, however the content is distribution independent and very easy (so long as you are not afraid to build your own kernel and edit your xorg.conf file). I DID use the proprietary ATI drivers instead of the open-source ones (Yes I know, blasphemy) but they work pretty well. My only issue is the composite support isn't the greatest. Using a composite manager DOES work, however it will cause your video and OpenGL applications to display funny, so it's best to shut off your composite manager before you use either. You do not need to disable compositing in your xorg.conf file for this, just shut off the composite manager itself (xcompmgr in my case).

Also to note is the open source 'radeon' driver at http://www.x.org/wiki/radeon. It works decently well, although it is not entirely there yet.

·ATI SB700/Realtek 888 audio - There is a little bit of a trick to get this to work. Firstly, make sure that you have these options set in the kernel:

<M> Intel HD Audio
[*]     Build hwdep interface for HD-audio driver
[*]     Support digital beep via input layer
[*]     Build Realtek HD-audio codec support
[  ]     Build Analog Device HD-audio codec support
[  ]     Build IDT/Sigmatel HD-audio codec support
[  ]     Build VIA HD-audio codec support
[*]     Build ATI HDMI HD-audio codec support
[  ]     Build NVIDIA HDMI HD-audio codec support
[  ]     Build Conexant HD-audio codec support
[  ]     Build C-Media HD-audio codec support
[  ]     Build Silicon Labs 3054 HD-modem codec support
[*]     Enable generic HD-audio codec parser
[*]     Aggressive power-saving on HD-audio
(60) Default time-out for HD-audio power-save mode

Make note of the Intel HD Audio driver being built as a module and not built into the kernel itself. Don't worry about the other drivers in there for Nvidia, VIA, etc. From there, you have to explicitly tell the driver which model of computer you have. A quick browse through Documentation/sound/alsa/ALSA-Configuration.txt in the kernel directory gives a list of all of the different model names that the driver supports. The chipset in the computer itself is a Realtek ALC888. The model of the computer you want to use is named 'targa-dig' (this is for both Targa and MSI machines).

To do this, just edit (or create) a file in your /etc/modules.d directory. You can call it whatever you want, however for ease of identification I named it 'sound'. Add these lines to 'sound':

alias snd-card-0 snd-hda-intel
alias snd-slot-0 snd-hda-intel
options snd-hda-intel model=targa-dig

* NOTE * For Gentoo (and probably others) after you have done this you MUST run 'update-modules' otherwise these lines will not be added to /etc/conf.d/modules. I suppose you could add these lines yourself, however Gentoo will complain if you do. From here just make sure you are out of X, restart alsasound in /etc/init.d, and your sound should now work, enjoy!

·Toshiba Bluetooth - This was pretty straight forward to setup. I just followed the instructions at Gentoo Linux Bluetooth Guide and got it working right away. Again, that is Gentoo documentation, but it is distribution independent. It was rather easy to setup and I was able to connect my cell phone to it right away. Not that I will ever use it, but I figured that I might as well set it up anyways. The only other thing to watch out for is that it also has a hardware swtich that needs to be enabled before Linux (or its module) is loaded. * Read Below *


Things to watch out for:

·ENE0100 Infrared Receiver - A driver exists in LIRC called ene0100. Check out the LIRC website for information on how to set LIRC up.

·RaLink 2860 802.11n - As I mentioned above, this a decently new chipset. There is a driver for it named rt2860 from RaLink that is included in the staging drivers section of the kernel. There is also a VERY EXPERIMENTAL driver in the wireless drivers section of the kernel from rt2x00. I haven't messed around with it yet as it supposedly does not even work and is meant for developers currently.

For the staging driver, there is a slightly 'out of order' way to get the device to connect to a wireless AP. I made an executable script which I found from someone's post on Ciaran McCreesh's Blog:

# ra0 startup begin

rm -f /var/run/dhcpcd-ra0.pid

bash -x -c 'ifconfig ra0 up'
bash -x -c 'iwconfig ra0 enc open'
bash -x -c 'iwconfig ra0 key <YOUR_KEY_HERE>'
bash -x -c 'iwconfig ra0 essid <YOUR_ESSID_HERE>'
bash -x -c 'dhcpcd ra0'

# ra0 startup end

It's not pretty, but it works. The downside is that you have to always know the essid (and key if needed) of wherever you are trying to connect. This can become a royal pain after a while if you are constantly moving around and connecting to different essid's all of the time. Also, as with the Bluetooth and webcam, there is a hardware switch that needs to be turned on beforehand. * Read Below *

·Hardware switches - There are a series of hardware switches that control the webcam, Bluetooth, and 802.11. These have to be turned on before you boot Linux, otherwise you will have to unload and reload the module that controls the specific device for it to be recognized. It's not too bad, but if you're impatient like me it will probably drive you nuts after a while :)

·Optiarc DVD RW AD-7560S - NOT a Linux issue, but I decided to mention it anyways. I, as well as others, have been getting I/O errors with this drive. I had to reboot my Gentoo Live and GParted boot CDs numerous times before I was able to get them to work. I have not spent much time with it yet, although I did find a firmware update for it that claims to have "better support" (whatever that means) which will hopefully resolve the issue. Unfortunately this is starting to seem like an all to common reocurring theme for some drives anymore.

IMPORTANT UPDATE NUMBER 2:
Well, after testing it for a while, the firmware update DID NOT work. It still gets I/O errors just as much as before. I'm not really sure what else to do with this drive aside from just replacing it. Might as well get a nice Blu-Ray drive to use instead.

I will keep the first update I wrote here just for historic purposes, however it is totally useless in fixing the drive...

Old 'historic' update that is now totally worthless as it doesn't work:
Here is my disclaimer: I take NO responsibility for what you do to your own computer. If you follow these instructions you are doing so AT YOUR OWN RISK. If something breaks, it is YOUR fault and NOT mine. Now with that being said, I will continue :) I downloaded the firmware upgrade for the drive at DVD RW AD-7560S Firmware Upgrade Program Version SS03. Unfortunately it is for a Sony VAIO computer and nothing else. I figured that I would give it a shot anyways. For the humor side of it, my track record for what happened is as follows: :)

I first attempted to just run the EP0000164211.exe executable through Windows as was instructed by the Sony VAIO website. A dialog box popped up saying that it would first eject the drive and then update my old firmware version 'SX01' with firmware version 'SS03' after I clicked update. Unfortunately after clicking update, the program just shut off and that was that, nothing. Foruntunately the drive still worked so I knew that it hadn't done anything. From there I knew it was time to start messing around with the file itself.

Obviously it was not going to update it as it was looking for a drive with SS firmware (Sony's) and not SX (MSI's). My dad had told me of the same experience he had with a drive of his a while back and how he tricked the updater by changing the updated firmware's name with a hex editor. I figured what the heck I will give it a try. Loading up my favorite command-line hex editor shed (simple hex editor), I searched the executable for the string 'SS03' and found one instance of it and changed it to 'SX03'. I was hoping that the installer would now compare the old firmware with 'SX' instead of 'SS'. I filed it away and rebooted back into Windows.

This time, running the executable promptly gave me an error saying that it could not extract any files because the executable was now corrupt. Dang. What could this mean? I sat for a second and thought that maybe this executable was just a self extracting archive; it said that it was trying to extract something. I redownloaded the file and tried to extract it manually and sure enough, a file named Optiarc-AD-7560S-SS03-Web.EXE was exctracted. I tried running the file with Wine under Linux just to see what would happen, (un)fortunately it said that it could not find the corresponding hardware, but it DID say that if it did it would update it with firmware version 'SS03'. I figured this was good as it would now allow me to test my edited executable and would also ensure that I wouldn't wipe out my drive on accident if I messed anything up while editing. With this new boost of confidence I loaded the new file with shed and searched for 'SS03' again and found six different instances of it within the file. I decided to once again say the heck with it and change all six, hoping that would take care of everything. I filed it away and ran it with Wine again and sure enough it failed finding the drive, but this time it said that it would be updating with firmware version 'SX03'. I was finally getting somewhere.

Rebooting once again, I took a deep breath and ran my newly edited executable and crossed my fingers. The same dialog window popped up (now with version 'SX03' in it). I clicked update and amazingly enough the drive ejected just as it said it would, and a progress bar on the bottom started to prorgess to the right, it was working! After a minute or so, another window popped up saying that the update was complete and to restart my computer. I restarted and booted into Linux and ran 'hdparm -i /dev/hda' and saw that sure enough, the drive was now running firmware version SS03. Finally, the new firmware was on there. From there it was off to load my Gentoo Live CD and see what happened.


Final thoughts:

Altogether this machine is very nice. At the time of this writing it could be found for $1100 - $1250. The price will more than likely drop as time goes on as well. The 320GB SATA 7200 RPM HDD is very fast (hdparm -t shows that it runs around 63 MB/sec). The ATI Mobile 3850 Graphics is amazing as well. Very fast and very easy to get working with full DRI support. I would definitely recommend this machine to anyone who is in need of a laptop that can actually rival some desktops. If it wasn't for my monstrous overlclocking on my desktop, it WOULD rival it.

Wally. With the red trim, who do you honestly think I named it after? Everyones favorite red-headed cartographer from the greatest games ever made of course! :)
Wally.  Who do you honestly think I named it after? :)

Linux On Laptops